What to Know Before Getting a Helix Piercing
A helix piercing sits along the upper outer rim of your ear cartilage. It is a versatile choice for a single subtle stud, a double or triple stack, or a more curated ear look. Expect a quick pinch, a longer healing period than a lobe piercing, and a real commitment to avoiding pressure, snags, and early jewelry changes.
For the best start, choose a reputable professional piercer who uses a single-use sterile hollow needle, not a gun. Begin with an implant-grade titanium or solid-gold flat-back stud, clean with sterile saline, and plan for full healing to take roughly 6 to 12 months.
The appeal is clear: a helix can be understated enough for everyday life, yet polished enough to complement an elevated Saratoga Springs event look. But cartilage is less forgiving than a lobe. Sleeping on it, wearing tight over-ear headphones, or switching to a hoop too soon can lead to the irritation bumps helix piercings are known for.
Guest Posts shares this guide to help you make a stylish, informed decision before booking your appointment.
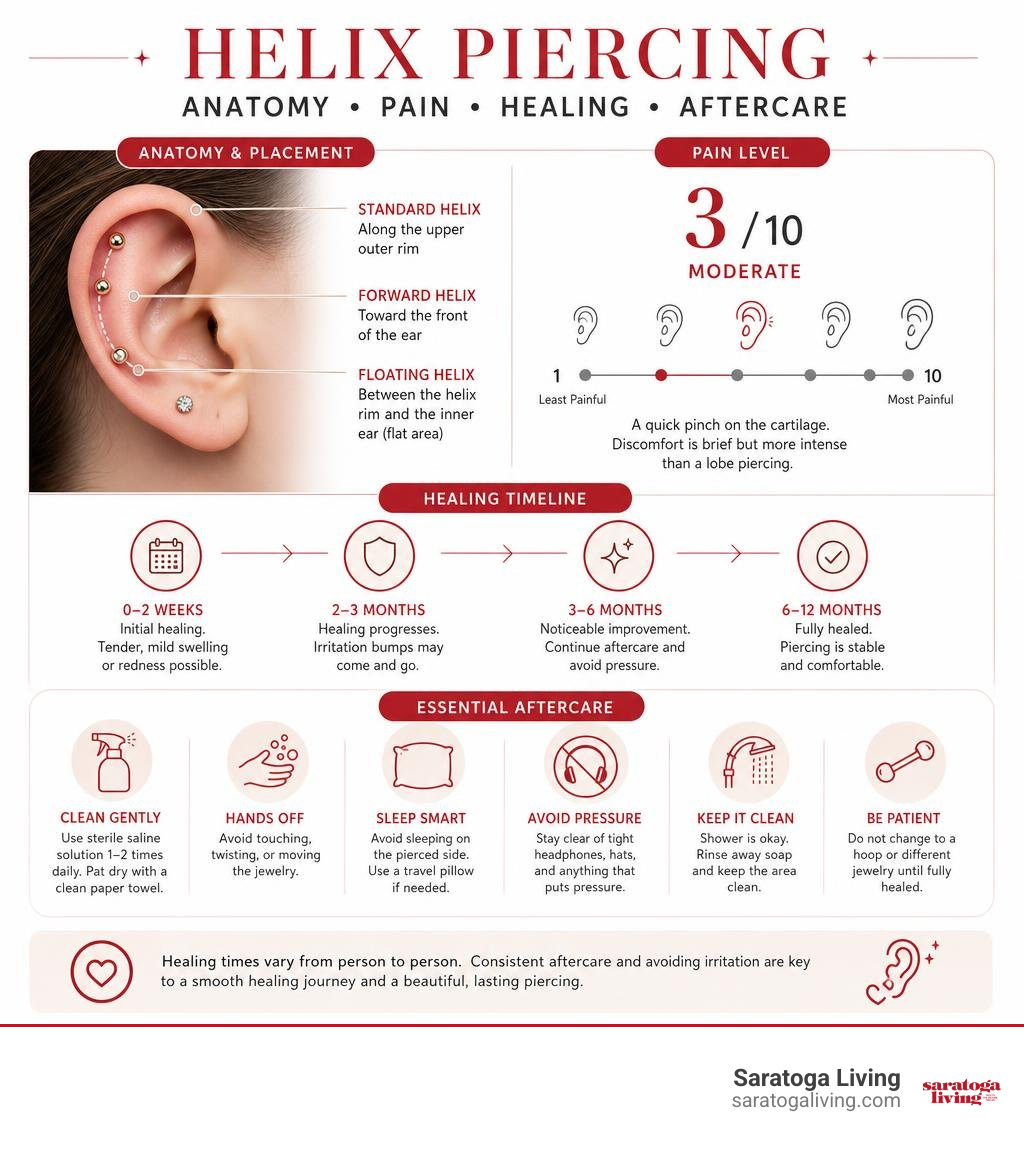
Understanding the Helix Piercing: Anatomy and Placement Styles
The ear’s upper rim is composed of flexible yet firm cartilage known as the helix curl. Unlike soft, fleshy earlobes, this area has a distinct anatomical framework. A professional piercing artist will always assess your ear’s natural ridges, folds, and curves to map out a location that flatters your profile. Consulting our Single Helix Piercing Guide can provide visual clarity on how different ear shapes accommodate specific placements.
Standard, Forward, and Floating Placements
A standard helix piercing passes through the outer upper rim of the ear cartilage. It remains the most widely requested cartilage piercing because it works beautifully with minimalist studs, ornate gems, and snug hoops once fully healed.
Beyond standard placement, several popular variations have emerged:
- Forward Helix: Located on the front-facing cartilage curve directly above the tragus and close to the face. These look striking with tiny diamonds or micro-discs, though they require adequate cartilage depth to prevent migration.
- Mid-Helix (Low Helix): Positioned midway down the outer edge between the upper cartilage rim and the standard lobe. It serves as an ideal bridge for connecting lower lobe stacks to upper ear curation.
- Flat Helix: Positioned on the smooth, flat area of cartilage between the outer rim and the inner ear ridge. This spot provides a broad canvas for larger decorative clusters, celestial shapes, and floral gold ends.
- Floating and Hidden Helix: A modern technique where the piercing is tucked beneath the upper cartilage fold. Using a curved bar or threadless hardware, the decorative end or dangling chain appears to float magically over the ear’s edge without visible posts.
Double and Triple Cartilage Stacks
For those wanting a curated, dimensional look, stacking multiple piercings in a row is a fantastic choice. Double and triple helix piercings involve placing two or three punctures closely together along the cartilage curve.
When planning multi-piercing arrangements, keep the professional 2/3 Rule in mind: limit yourself to healing no more than two or three cartilage piercings simultaneously. Healing cartilage requires significant immune resources. Trying to heal too many punctures at once prolongs swelling, increases irritation risks, and delays overall fistula formation. Spacing them with intentional millimeter clearance ensures the jewelry sits flush without rubbing together.
Needle vs. Gun: The Professional Piercing Procedure and Pain Expectations
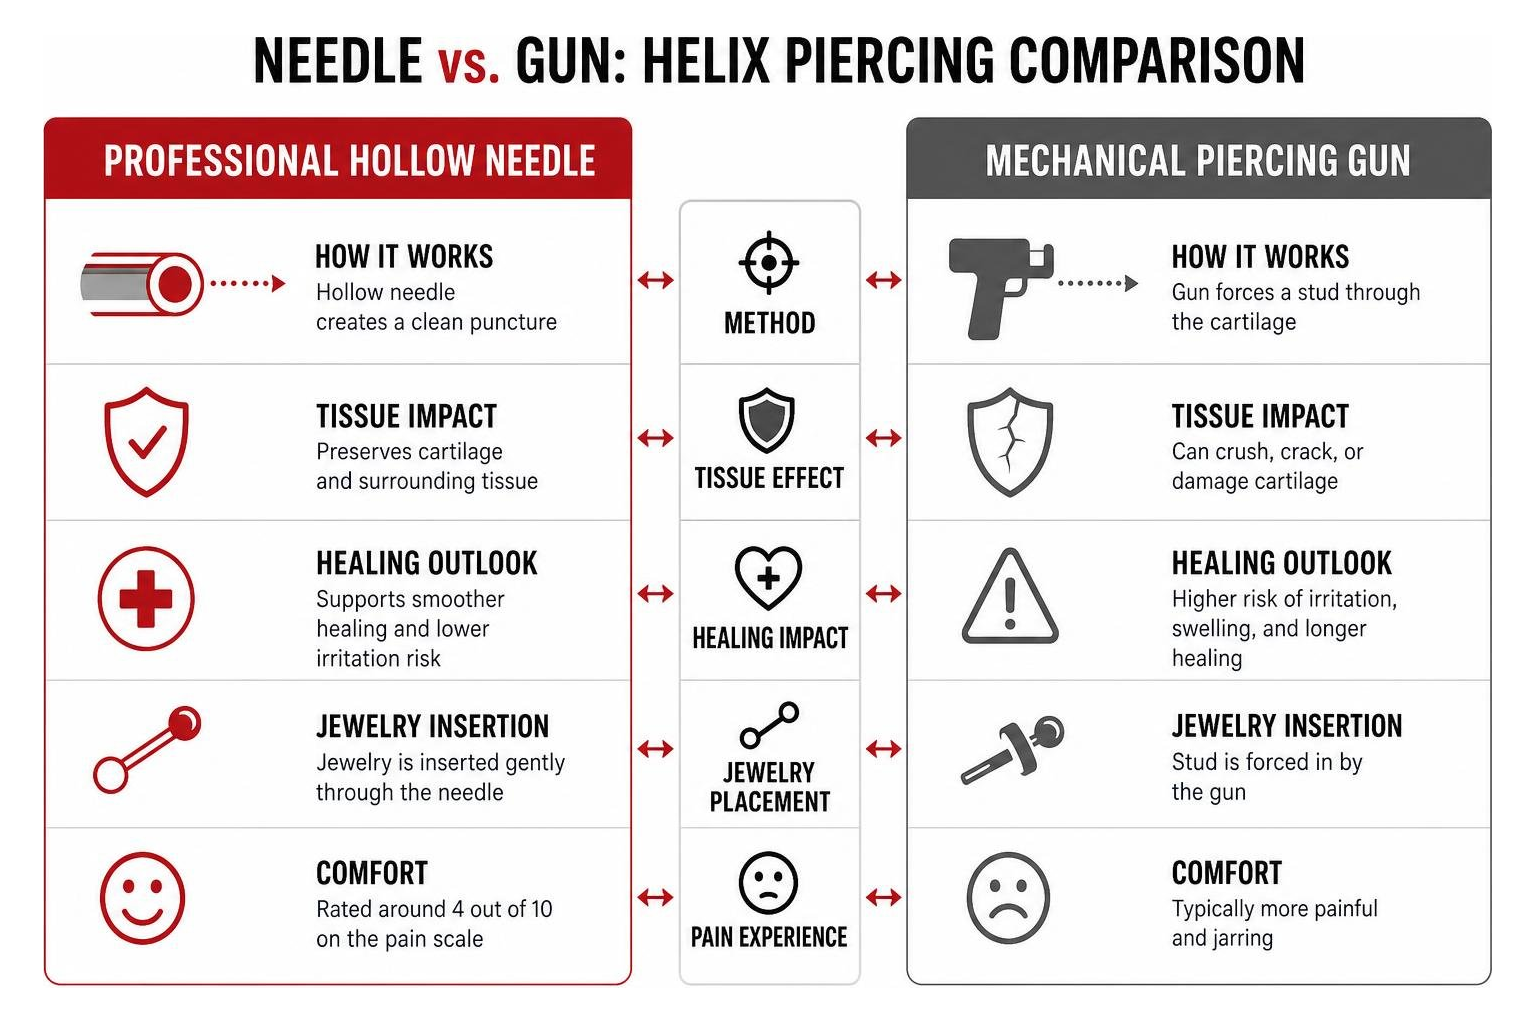
The technique used to perform your piercing makes all the difference in comfort, tissue preservation, and healing success. Understanding what happens during a professional studio appointment helps demystify the process.
Pain Scale and Sensation Breakdown
Pain is subjective, but most clients rate getting a helix pierced around a 4 out of 10.
Because cartilage is denser than earlobe tissue, you will feel a sharp pinch that lasts under a second, often accompanied by a subtle “crunch” sensation. That sound is entirely normal—it is simply the dense cartilage displacing as the needle passes through. Afterward, expect a warm, localized throbbing or mild burning sensation that generally subsides within two to four hours.
Why Hollow Needles Outperform Piercing Guns
Professional studios exclusively use single-use, hollow-bore medical needles rather than mechanical piercing guns or spring-loaded plastic cassettes. Here is why needle piercing is non-negotiable for cartilage:
- Prevents Structural Trauma: Hollow needles are razor-sharp and bevel-edged, designed to create a clean, precise opening by smoothly displacing tissue. Piercing guns use blunt force to jam a dull earring stud directly through the ear, which can shatter cartilage permanently and cause irreparable tissue deformation.
- Superior Sanitation: Piercing needles are pre-sterilized, individually packaged, and discarded in sharps containers immediately after use. Plastic piercing guns cannot be placed into medical autoclaves without melting, creating a genuine risk of cross-contamination.
- Proper Initial Jewelry Fit: Piercing guns attach tight butterfly backings that trap moisture, hair, and bacteria against the skin while constricting normal inflammatory swelling. Needle procedures allow the piercer to insert an elongated, implant-grade post that accommodates initial swelling comfortably.
Healing Timeline and Daily Aftercare Protocols
Cartilage is an avascular structure—meaning it lacks the direct, rich blood supply found in soft earlobes. Because nutrients reach the tissue through slow diffusion from surrounding tissue, healing takes patience. A helix piercing typically requires 6 to 12 months to reach complete internal stability.
The Critical Stages of Helix Piercing Healing
Cartilage heals from the outside in. Reviewing our Helix Piercing Guide: Types, Pain & Healing helps illustrate what to expect during each developmental stage:
- Inflammatory Stage (Weeks 1 to 4): The ear experiences localized redness, mild swelling, tenderness, and clear lymph fluid production that dries into crusties.
- The “False Heal” Window (Months 2 to 4): The external entry and exit holes appear smooth and calm, leading many to assume the piercing is completely healed. In reality, the delicate internal channel (the fistula) is still fragile. Changing jewelry during this window frequently causes tears, irritation bumps, and setbacks.
- Fistula Maturation (Months 6 to 12): The internal tunnel of tissue thickens, tightens, and stabilizes into resilient skin capable of handling jewelry rotations and hoop tension.
Safe Cleaning Habits and Sleep Adjustments
Consistent, hands-off aftercare is the cornerstone of healing. Stick to the LITHA principle (“Leave It The Heck Alone”) paired with a simple daily cleaning regimen:
- Clean Twice Daily: Spray the front and back of the piercing with sterile 0.9% sodium chloride saline spray. Avoid homemade salt mixtures, which can dry out delicate tissue if mixed incorrectly.
- Dry Thoroughly: Moisture traps are a primary trigger for cartilage bumps. After spraying or showering, gently blot the site dry with clean, disposable non-woven gauze or paper towels. Alternatively, dry the ear using a blow dryer on a cool, gentle setting. Never use fibrous cotton balls or swabs, as loose threads can wrap around the post.
- Prevent Sleep Friction: Never sleep directly on an unhealed helix piercing. If you are a side sleeper, use a donut-style piercing pillow or a standard U-shaped travel neck pillow, positioning your pierced ear comfortably in the open center space.
- Avoid Friction & Snags: Keep hair products, perfumes, and heavy conditioners away from the upper ear. Take extra care when brushing your hair, pulling shirts over your head, and answering cell phones.
Selecting Starter and Healed Jewelry
Selecting appropriate body jewelry ensures a smooth healing process and sets the stage for a stunning long-term aesthetic.
Biocompatible Metals and Initial Labret Posts
For fresh piercings, jewelry material and construction are paramount:
- ASTM F136 Implant-Grade Titanium: The industry gold standard for fresh piercings. It is hypoallergenic, lightweight, durable, and 100% nickel-free.
- 14K or 18K Solid Gold: An excellent, biocompatible option for luxury styling. Ensure the gold is nickel-free and solid throughout—never plated, filled, or vermeil, which can peel and harbor bacteria inside the healing wound.
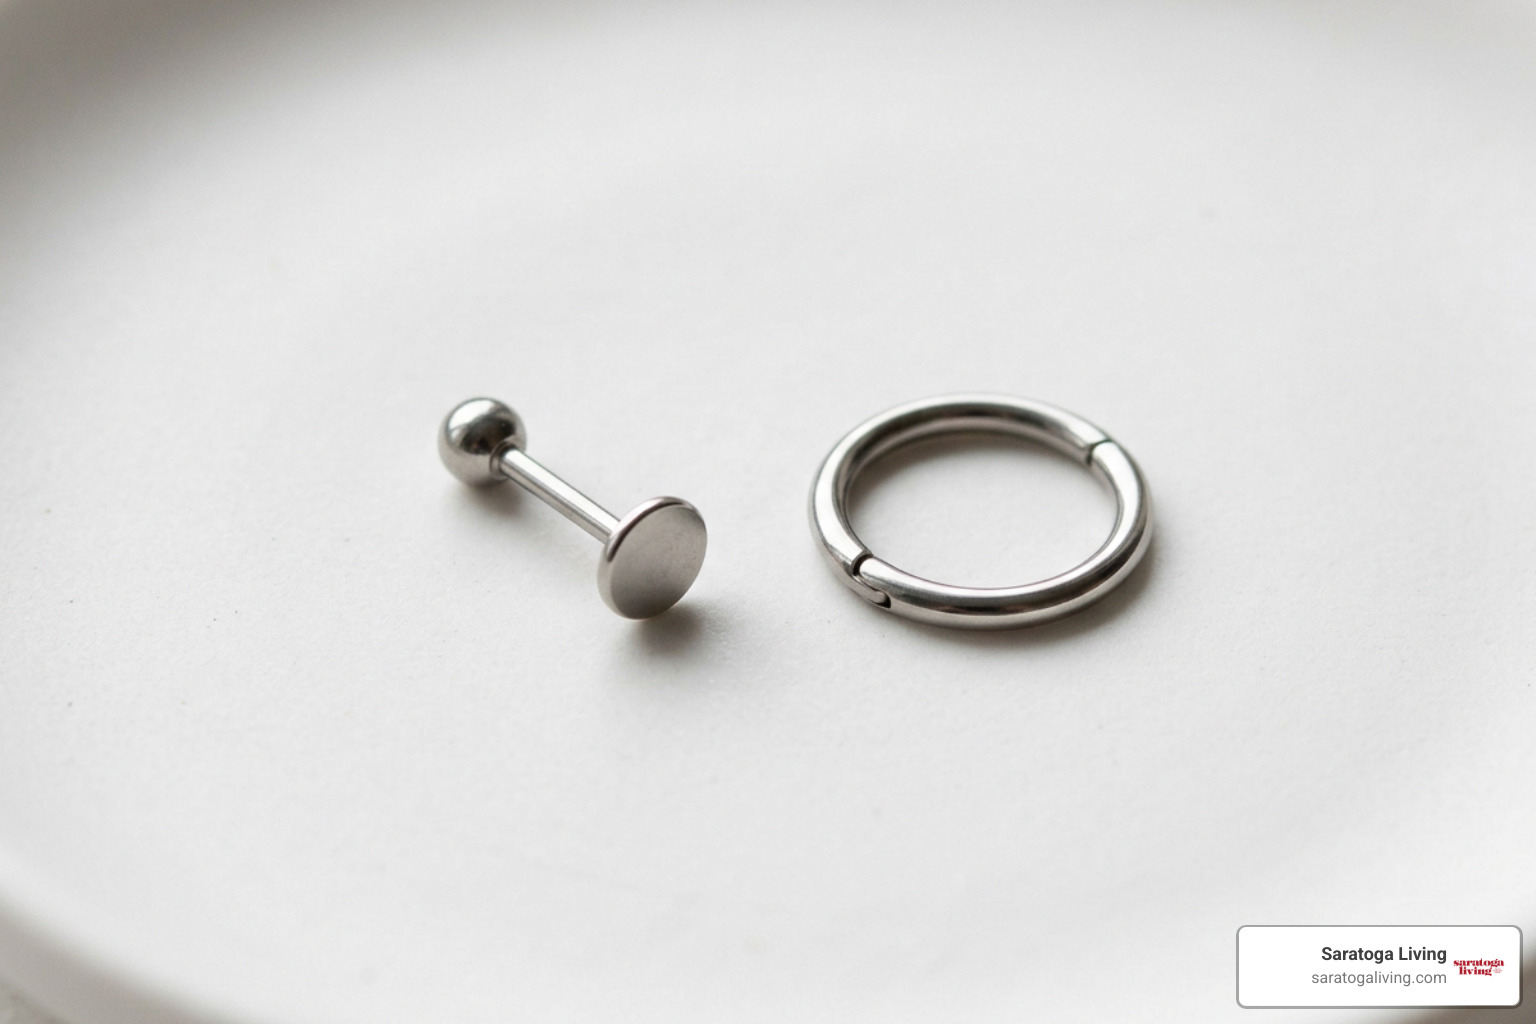
- Initial Post Design: Fresh helix piercings must always be fitted with a straight, threadless or internally threaded flat-back labret stud (typically 16G or 18G). The post will initially be slightly longer (8mm to 10mm) to allow room for natural swelling.
- The 4- to 8-Week Downsize: Once initial swelling completely subsides, visit your piercer to downsize to a shorter, snugger post (typically 6mm to 7mm). Leaving an overly long post in place leads to snagging and causes the piercing channel to migrate at an unwanted angle.
Best Jewelry Options for a Fresh vs. Healed Helix Piercing
Once your piercer confirms the fistula is fully matured at the 6- to 12-month mark, a wide variety of jewelry styles becomes available. For extensive hoop sizing guidelines and metal selection advice, explore our Helix Piercing Hoop Styling Guide.
- Seamless Rings: Minimalist, clean metal hoops that twist open and closed for a seamless appearance.
- Clicker Rings: Feature a hinged segment that snaps securely into place with an audible click, making at-home jewelry changes easy.
- Huggie Hoops: Small-diameter hoops (often 6mm to 8mm) designed to fit closely against the outer cartilage rim.
- Captive Bead Rings (CBRs): Classic body jewelry featuring a small dimpled bead held in place by ring tension.
Troubleshooting Common Piercing Complications
Cartilage piercings are notoriously reactive to stress. Knowing how to distinguish everyday irritation from serious medical issues prevents panic and ensures appropriate care.
| Condition | Primary Cause | Visual Signs | Recommended Action |
|---|---|---|---|
| Irritation Bump (Granuloma / Hypertrophic) | Sleep pressure, jewelry movement, premature hoops, moisture traps | Small, soft or firm, flesh-colored bump at entry/exit hole | Downsize post, remove pressure, utilize travel pillow, keep dry |
| Bacterial Infection | Pathogenic contamination, unwashed hands, contaminated swimming water | Spreading redness, extreme heat, throbbing pain, thick green/yellow pus | Keep jewelry in place; seek immediate medical evaluation for antibiotics |
| True Keloid | Genetic predisposition to excessive collagen scarring | Large, firm, rubbery scar extending well beyond the piercing hole | Consult a dermatologist or medical doctor for specialized treatment |
Managing Cartilage Irritation Bumps
An estimated 90% to 95% of cartilage lumps are benign irritation bumps, not keloids. They are your body’s localized inflammatory response to friction, angular pressure, or snagging.
To resolve an irritation bump, identify and eliminate the underlying trigger:
- Stop sleeping on that side.
- Downsize an overly long post that shifts around.
- Ensure the ear is dried completely after every shower.
- Never apply harsh chemical home remedies such as tea tree oil, rubbing alcohol, crushed aspirin paste, or hydrogen peroxide, which irritate healing cartilage further.
Recognizing and Treating Infections
True bacterial infections require prompt professional medical attention. If you notice spreading erythema (redness), skin that feels hot to the touch, persistent throbbing, fever, or thick, discolored discharge, see a physician immediately. Do not remove the jewelry unless directed by a doctor, as removing the post can allow the outer skin to close, trapping the infection inside the cartilage tissue.
Frequently Asked Questions About Upper Ear Piercings
Can I sleep on a new cartilage piercing?
No. Sleeping directly on a fresh helix puts continuous mechanical pressure on the ear, restricting blood flow and forcing the jewelry post to heal at a crooked angle. This pressure is the single most common cause of stubborn cartilage bumps. Use a donut pillow or sleep on your back or opposite side throughout the healing timeline.
When is it safe to change to a hoop?
Plan to wait at least 6 to 9 months—and ideally a full year—before switching to a curved hoop. Hoops exert curved tension on straight piercing channels. Introducing a ring before the internal fistula has fully matured and hardened will almost invariably trigger irritation bumps and setbacks.
What should be avoided during the healing period?
During your recovery window, steer clear of:
- Submerging your ear in lakes, oceans, pools, or hot tubs for at least 6 to 8 weeks.
- Wearing tight over-ear headphones that press firmly against the upper cartilage.
- Twisting, turning, or picking crust from your jewelry with bare hands.
- Applying makeup, dry shampoo, hair sprays, or facial exfoliants directly near the piercing site.
Conclusion
A well-executed helix piercing is a timeless addition to any personal style, offering an ideal balance of refined edge and understated elegance. Whether you prefer a single shimmering diamond stud or a curated ear stack of mixed metals and textures, successful healing boils down to precision technique, quality materials, and patient aftercare.
From dressing up for track season to curating stylish fit checks for the Belmont Stakes, an intentional ear stack adds effortless polish to every ensemble. Invest in a skilled professional piercer, stick to your saline routine, give your ear the time it needs to heal, and you will enjoy a stunning cartilage accent for decades to come.